
まえがき
ファイルの中身のデータを前から順番に解釈しながら読み込む場合、ファイルを1バイトずつ、もしくは1文字ずつ読み込むと処理がしやすくなることがあります。
この記事では、読み込みと書み込みのJavaのサンプルコードを示します。
1バイトずつ読み込んだ方が汎用性は高いのですが、1バイトずつ読み込む場合はマルチバイト文字も1バイトずつ分割しながら読み込むので、マルチバイト文字の内容を解釈する場合は1文字ずつ読み込んだ方が楽です。
ただし、1文字ずつ読み込む場合は以下のことに注意する必要があります。
- 文字エンコーディングを指定する必要がある
- Javaの内部(メモリ)では文字エンコーディングに「UTF-16」を適用して文字列が保持される
サンプルコード
ソースコード
FileReadWriteMain.java
import java.io.FileInputStream;
import java.io.FileOutputStream;
import java.io.IOException;
import java.io.InputStreamReader;
import java.io.OutputStreamWriter;
import java.nio.ByteBuffer;

public class FileReadWriteMain {

    public static void main(String[] args) {

        // 1バイトずつ読込(バイナリファイルとして処理)
        System.out.println("[1バイトずつ読込]");
        FileInputStream fis = null;
        FileOutputStream fos = null;
        try {
            fis = new FileInputStream("C:\\tmp\\test.txt");
            fos = new FileOutputStream("C:\\tmp\\test_b.txt");
            int data;
            while ((data = fis.read()) != -1){
                // 表示のため、読み込んだ1バイトのデータを変換
                // int → byte配列 → 文字列
                // byte配列は4バイト固定、文字列にパディングされたnul文字は削除
                byte[] bytes = ByteBuffer.allocate(4).putInt(data).array();
                String str = new String(bytes, "MS932");
                str = str.replace("\u0000", "");
                // 表示のため、読み込んだ1バイトのデータを変換
                // 10進数 → 16進数
                String hex = Integer.toHexString(data);
                if (hex.length() == 1) {
                    hex = "0" + hex;
                }
                // 読み込んだ1バイトのデータを表示
                System.out.println
                    ("読み込んだデータ:" + str + "(0x" + hex + ")");
                // ファイルに書き込み
                fos.write(data);
            }
        } catch (IOException e) {
            e.printStackTrace();
        } finally {
            try {
                fis.close();
                fos.close();
            } catch (IOException e) {
                e.printStackTrace();
            }
        }

        // 1文字ずつ読込(テキストファイルとして処理)
        System.out.println();
        System.out.println("[1文字ずつ読込]");
        InputStreamReader isr = null;
        OutputStreamWriter osw = null;
        try {
            isr = new InputStreamReader(
                    new FileInputStream("C:\\tmp\\test.txt"), "MS932");
            osw = new OutputStreamWriter(
                    new FileOutputStream("C:\\tmp\\test_t.txt"), "MS932");
            int data;
            while ((data = isr.read()) != -1){
                // 表示のため、読み込んだ1文字のデータを変換
                // int → byte配列 → 文字列
                // Javaでは内部的な文字エンコーディングに変換されることに注意
                // (内部的にはUTF-16を使用)
                byte[] bytes = ByteBuffer.allocate(4).putInt(data).array();
                String str = new String(bytes, "UTF-16");
                str = str.replace("\u0000", "");
                // 表示のため、読み込んだ1文字のデータを変換
                // 10進数 → 16進数
                String hex = Integer.toHexString(data);
                if (hex.length() == 1) {
                    hex = "0" + hex;
                }
                // 読み込んだ1文字のデータを表示
                System.out.println
                    ("読み込んだデータ:" + str + "(0x" + hex + ")");
                // ファイルに書き込み
                osw.write(data);
            }
        } catch (IOException e) {
            e.printStackTrace();
        } finally {
            try {
                isr.close();
                osw.close();
            } catch (IOException e) {
                e.printStackTrace();
            }
        }

    }
}
入力ファイル
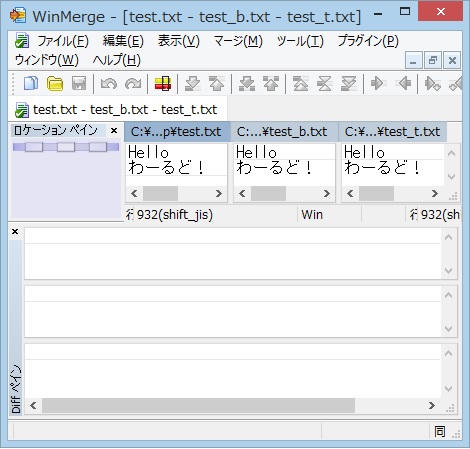
test.txt(文字エンコーディングは”MS932″(Shift-JIS))
Hello
わーるど!
実行時のコンソール表示
[1バイトずつ読込]
読み込んだデータ:H(0x48)
読み込んだデータ:e(0x65)
読み込んだデータ:l(0x6c)
読み込んだデータ:l(0x6c)
読み込んだデータ:o(0x6f)
読み込んだデータ:
(0x0d)
読み込んだデータ:
(0x0a)
読み込んだデータ:�(0x82)
読み込んだデータ:�(0xed)
読み込んだデータ:�(0x81)
読み込んだデータ:[(0x5b)
読み込んだデータ:�(0x82)
読み込んだデータ:�(0xe9)
読み込んだデータ:�(0x82)
読み込んだデータ:ヌ(0xc7)
読み込んだデータ:�(0x81)
読み込んだデータ:I(0x49)

[1文字ずつ読込]
読み込んだデータ:H(0x48)
読み込んだデータ:e(0x65)
読み込んだデータ:l(0x6c)
読み込んだデータ:l(0x6c)
読み込んだデータ:o(0x6f)
読み込んだデータ:
(0x0d)
読み込んだデータ:
(0x0a)
読み込んだデータ:わ(0x308f)
読み込んだデータ:ー(0x30fc)
読み込んだデータ:る(0x308b)
読み込んだデータ:ど(0x3069)
読み込んだデータ:!(0xff01)
出力ファイル
下記の通り、入力ファイル、出力ファイル(1バイトずつ読込時)、出力ファイル(1文字ずつ読込時)の間に差異無し。
あとがき
今回の記事で紹介した内容は、ローカルでファイルの入出力を行うバッチ処理を作りたい時に雛形として役立ちます。
ちょっとした作業の自動化にも使えるので、知っておいて損はないでしょう。
株式会社サイゼントでは、即戦力のJavaプログラマーを育てるための書籍「絶対にJavaプログラマーになりたい人へ」をKindleで販売しています。

同じく、Spring Frameworkについてきめ細かく解説した別冊も販売中です。

また、上記の書籍をテキストとして用いたプログラミングスクール「サイゼントアカデミー」も開校しています。
このスクールは、受託開発事業・SES事業である弊社が、新入社員向けの研修で培ったノウハウを詰め込んだものです。

ご興味がある方は、上記画像から個別ページにアクセスしてみてください!


コメント